F-series
NutriOpt On-site Adviser for F-series
This is the support page for the NutriOpt On-site Adviser, a service provided by Trouw Nutrition. This page contains information on how to get started with the app and how to conduct an analysis. Furthermore, you can find useful links to our partner AgroCares for support on your (F-series) device.
-
Getting started
-
Technical manual and AgroCares support page
-
Your first scan
-
FAQ
-
Manuals and how to use video
Getting started with the NutriOpt On-site Adviser for F-series
Below you can find information on how to get started as a new user with the NutriOpt On-site Adviser mobile application.
Installing the mobile application
Your handheld scanner is compatible with the NutriOpt On-site Adviser app in Google Play and Apple App Store. Once you have downloaded the app, it will request access to location data and permission to send notifications on your device. This access is required to register the sample and obtain the nutritional report.
Android
Use Android 8.1 or above. To download the app from the Play Store, your Google Play account should have a device certification. This certification can be found in the Google Play Store setting under 'Play Protect Certification'.
Apple
Use iOS 14 or above with iPhone model 11 or above. Download the app from the App Store.
Activate your account
Before you start using your new NutriOpt On-site Adviser scanner, you need to activate your account. Please contact your Trouw Nutrition representative to obtain access. You can find your regional Trouw Nutrition contact person via this page.
Login to the mobile app
After installing the NutriOpt On-site Adviser app on your mobile phone, you can log in by following the steps outlined in the email titled “Welcome to NutriOpt On-site Adviser”.
Navigation through the app
The NutriOpt On-site Adviser app is an easy-to-use app with different functionalities. You can find a step-by-step guide on how to use the app under the Your first scan tab.
Technical manual AgroCares
For more and up-to-date information on the handheld scanner you can follow this link to the support page of AgroCares, the supplier of the handheld scanner device.
Under the tab 'Scanner Lights Series F', you can find information on the lights on your F-series device. These can be helpful before, during or after scanning. The technical manual of the F-series device can be found in the 'Getting Started with AgroCares Serie F' tab.
You can also find useful information about your handheld scanner in the hardware manual.
Your first scan with the NutriOpt On-site Adviser
Performing your initial scan involves a series of steps. First, you need to establish a Bluetooth connection between the NutriOpt On-site Adviser app on your phone and the handheld scanner. Then, you must calibrate the scanner properly and once ready, you can initiate the scanning process. While these steps require attention, following the step-by-step process will ensure a smooth experience.
Step 1: Connecting the app on your phone to the handheld scanner
Begin by connecting your phone to the handheld scanner. To do this, ensure that you are logged in to the app and that your handheld scanner is switched on and fully charged.
Switch on and locate your device's name
Start by switching on your handheld scanner and locating the device's name. The name of your scanner is on the back side of the handle. The device name should follow this scheme: ‘SCxxxxxF’. For example “SC01234F”.
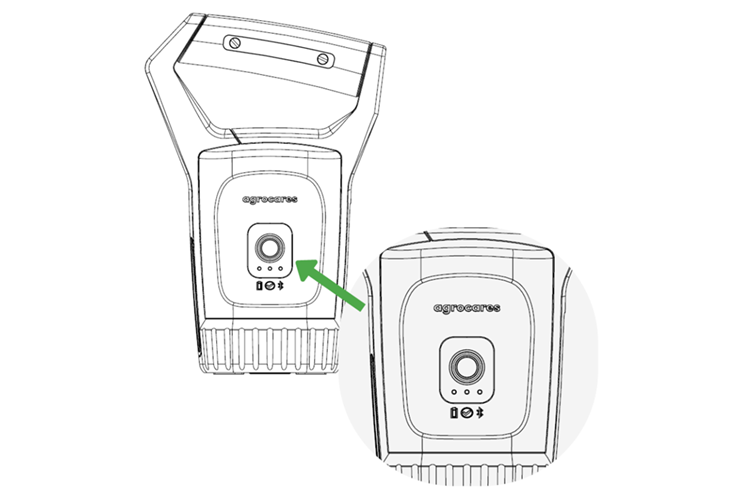
Press the round button on the scanner for one second. The scanner will initiate the start-up sequence with a steady green battery light (if fully charged) and two flashing red Bluetooth and measurement lights (1x/1 s). The scanner is now ready to connect to the phone.
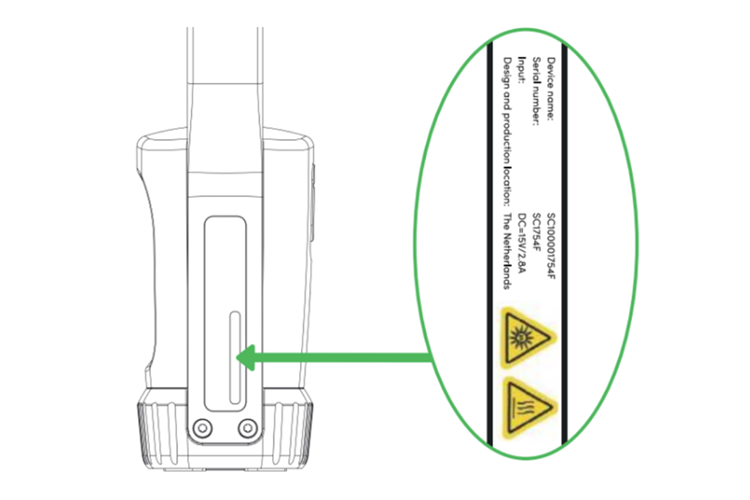
Locate the scanner name on the back side of the handle frame. The name typically consists of the letters SC, followed by a series of numbers and a letter representing the device version (e.g., SCXXXXXF) for the F-series.
Connecting your phone to the app
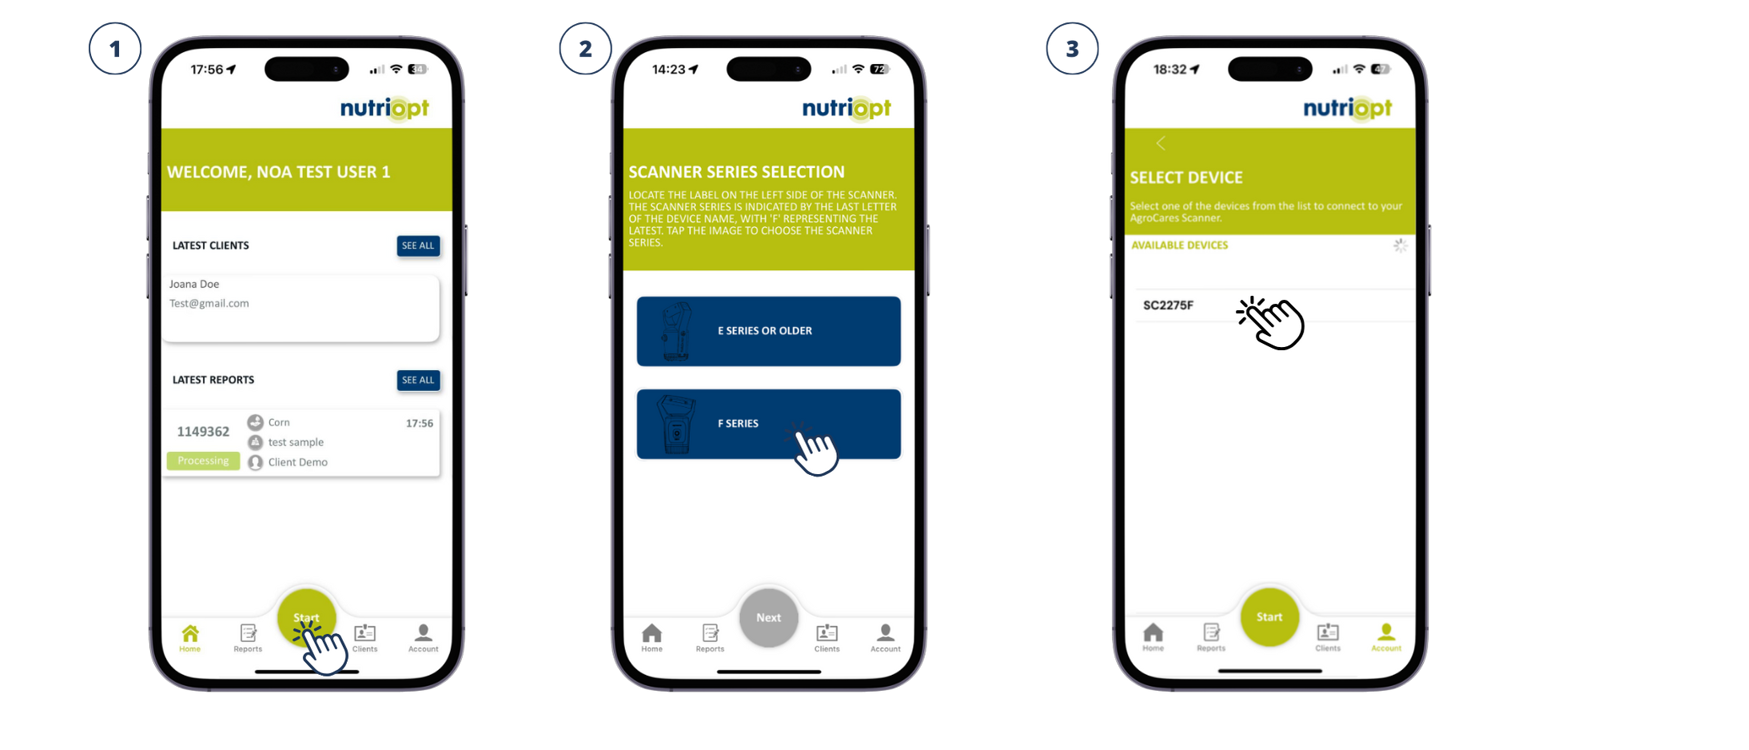
- Open the NutriOpt On-site Adviser app.
- Press 'START' button and you will be asked to select your 'Scanner Series'. Select Device Type F Series (3).
- Make sure to switch on Bluetooth on your mobile device. You can select your scanner from the 'Available devices' list (4). After you have selected your scanner, you will be redirected to the Homepage.
When the connection between your phone and handheld scanner is set, the scanner Bluetooth light will have a green blinking light (1x/1s). To save battery, the scanner often goes into "sleeping” mode and the Bluetooth light will turn red. Once you start the scanning process, the scanner will reconnect with the mobile phone and the Bluetooth light will blink in green.
Step 2: Material and client selection
Material selection
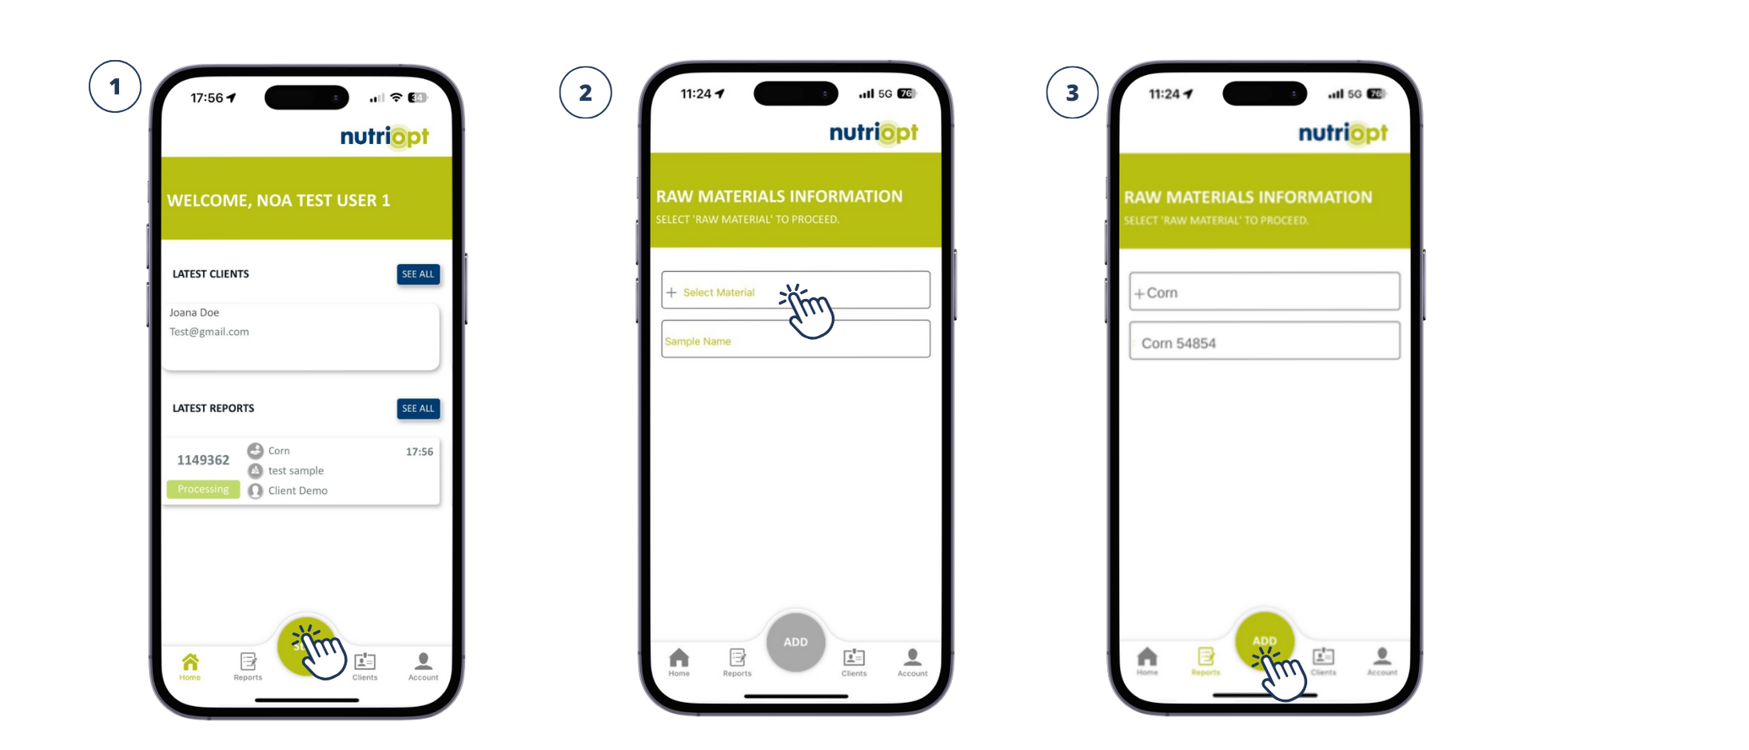
To initiate the scanning process, please click the 'START' button (1). In this step, you will be prompted to choose the raw material you wish to scan. Choose your Material and provide a Sample Name to your sample (2-3).
Once you have completed these steps, click "ADD" to continue to the 'CLIENT SELECTION' page.
Client selection
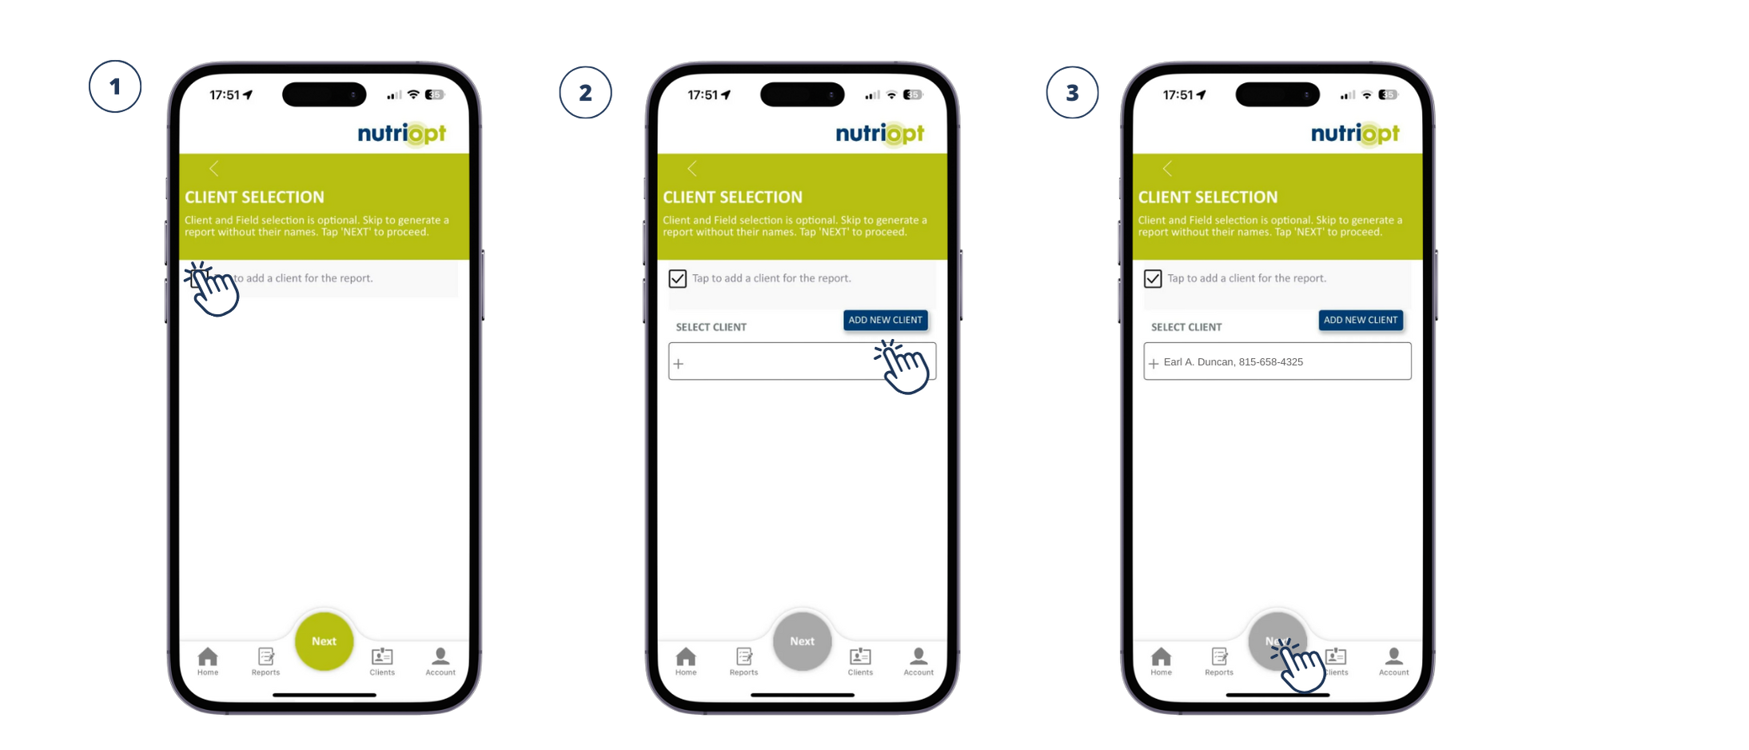
On the 'CLIENT SELECTION' page, you have the option to either select an existing client or add a new one (3). Please note that client selection is not mandatory, so you can also choose to continue by clicking the 'NEXT' button.
Step 3: Calibration of the scanner (two steps)
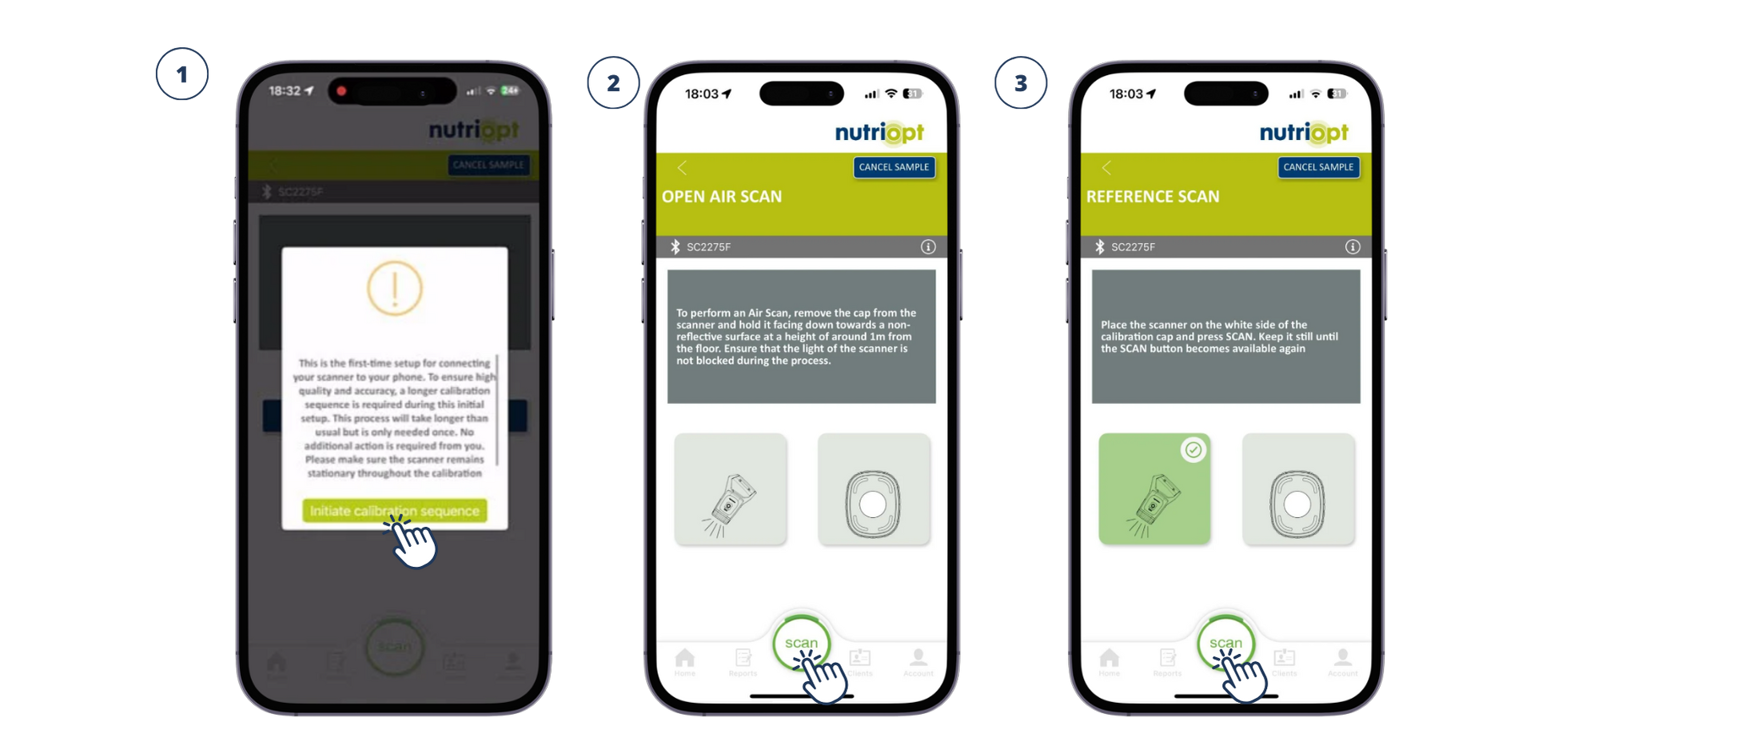
The application will notify you when calibration is needed, which is always before scanning a sample. When connecting a scanner to a mobile phone for the first time or after a new app update, a longer initial calibration sequence is required. To begin, press "Initiate Calibration Sequence" (1). Once this initial calibration is completed, the scanner will be memorized. For subsequent scans, only the shorter Open Air Scan and Calibration Cap Scan (with a white/yellow background) are needed.
1. Open Air Scan
Point the handheld scanner towards the ground, approximately 1 meter above a surface, and press the "Scan" button (2). Ensure that the glass surface is not covered and avoid pointing at reflective surfaces.
2. Calibration Cap Scan
- White background scan with calibration cap
Perform a white background calibration with the calibration cap. Ensure that the sensor head and glass plate are clean from dirt and moisture. If necessary, use the brush and/or tissues to clean them. Place the scanner on the calibration cap with the white side facing up, ensuring that the scanner glass is in contact with the white surface. Start the scanning process by pressing the 'scan' button in the app or on the device for one second (3).
- Yellow standard scan with calibration cap
If prompted by the application, perform a yellow standard scan using the yellow side of the calibration cap. Turn the calibration cap with the yellow side facing up and position the scanner on the calibration cap. Again, ensure that the scanner head is in contact with the yellow surface. Initiate the scanning process as before.
Step 4: Six steps to scan a sample
Before you can scan your sample, it needs to be prepared adequately to represent your testing area. Please read the sampling guide for instructions. Five scans are required for an accurate measurement. The scanner is equipped with a sample tray, which should be filled with the sample of choice.
Scanning your sample will require you to follow these six steps:
- Place the scanner on top of your sample. Make sure the scanning surface of the scanner head is in contact with your sample. You do not need to press down on this as the weight of the scanner is sufficient.
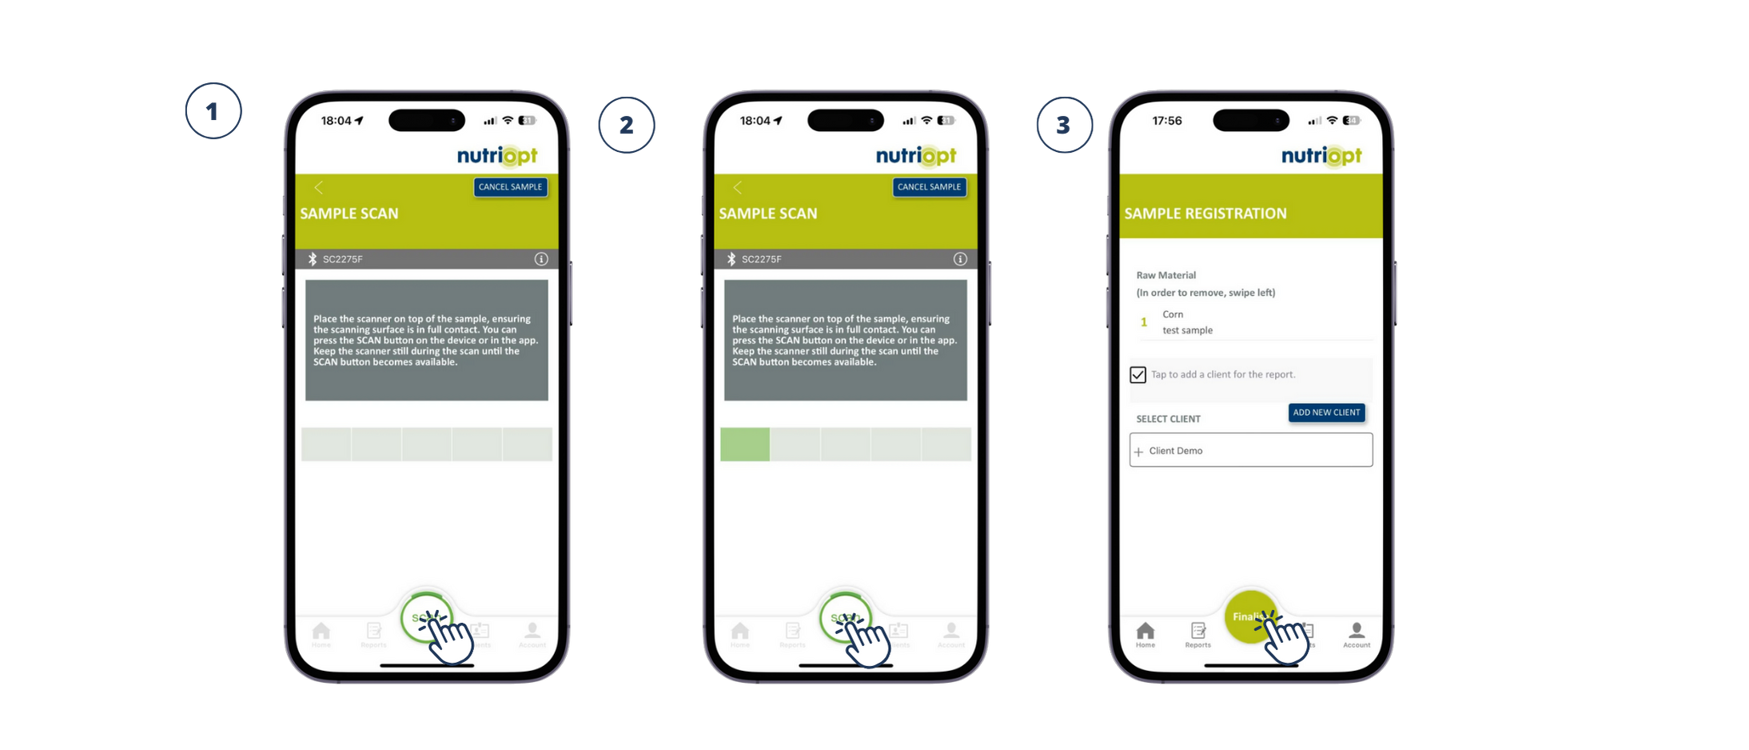
- Press the round button of the scanner for 1 second or press the "SCAN" button in the app to start the scanning process (1). Do not move the scanner while it is scanning or while the scanner lights are is blinking. The app will notify you when you can continue to the next scan. Clean the glass with a dry cloth/paper towel after each scan.
- When the scan is finished, place the contained sample back into your bucket. Mix it thoroughly, fill a new sample tray and repeat the process. You can position the scanner on a different place in the tray.
- Continue to repeat step 1 to 3 until all required 5 valid scans are finalized. Follow the process in the app to generate a report (2).
- You'll be directed to the sample registration page. Here, you can register a new client or select an existing client. Click “FINALIZE” to generate the report (3).
- Switch the scanner off and make sure it is properly cleaned before placing it back in the case.
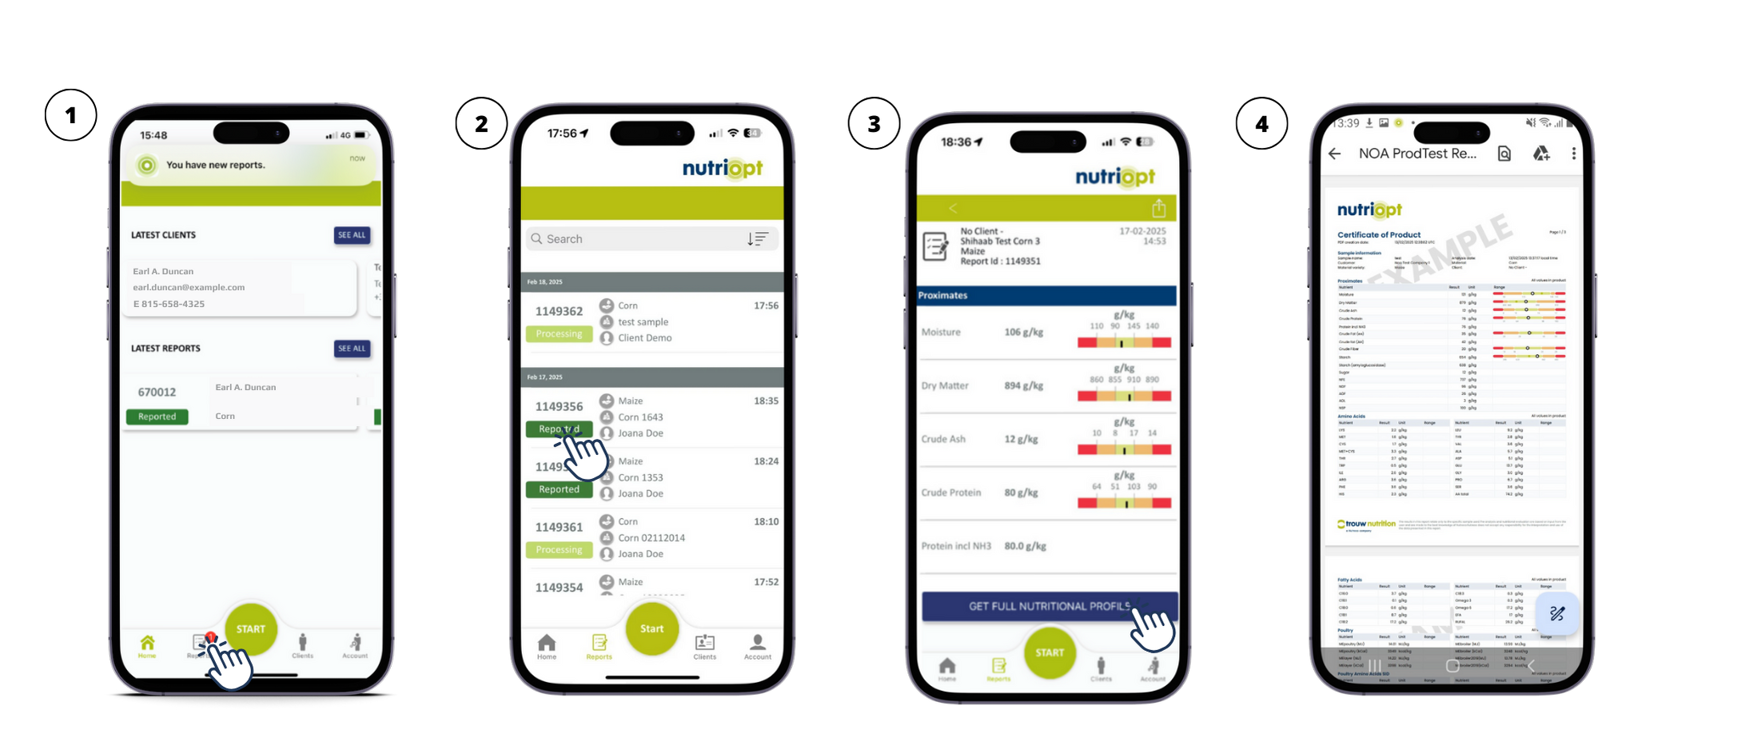
Step 5: Getting your results from the app
After the synchronisation is completed, you will be redirected to the ‘HOME’ page.
- It takes a minute for your report to be processed, but once finished, the app will notify you that your results are ready (1).
- You can find your report in 'Latest reports', and all reports are listed in 'Reports' according to the time and date (2).
- Once you click your report, the proximate analysis of your sample will be available (3). If you want, you can also receive a 'Full Nutritional Profile' of your sample (3).
- You can export the results to PDF (4) by clicking on the corresponding button on the screen.
FAQ and contact
Check out our Frequently Asked Questions (FAQ), to see whether you can directly solve the issue yourself. In case you are not able to find the answer, please contact your Trouw Nutrition representative. You can find your regional Trouw Nutrition contact person via this web page.
Are you experiencing difficulties while using the Scanner?
Try our new feature: the in-app FAQ. It is designed to help you immediately with questions you might have during the scanning process and enables you to proceed with the scanning process as quickly as possible. It is meant for online and offline app use.
- Where can you find the in-app FAQ?
- Navigate to the Account menu
- Select FAQ
- Get directed to the overview of all FAQs
- Selecting the right topic
- Select the topic that concerns your question and then select the problem that you experience.
- Receive instructions on how to solve your issue immediately.
If the instructions did not help you to solve your problem, then simply select ‘no’ and you will be given further help by our support team.
- Contact with our support team
We are positive that you will find your solution easily. If this is not the case, then the app will ask you if you want to contact support. When you click ‘yes’ an email is sent immediately to our support team and you will be contacted by one of our colleagues.
You are receiving a prompt message saying " This account is logged in on another phone. Pressing Log Out will stop unsynchronized samples from being processed on the old phone. Please synchronize your data on the old phone before logging out."
This message will pop up when you are still logged into another smartphone. Log out of the other account and log into the device you want to use the Scanner with.
However, the message can also appear when you are not logged into another device. This might occur when you logged out of your account while the internet was unstable. When you are unable to log into your account contact support (your local Trouw Nutrition representative) to get access again to your account.
Can't you find the answer to your question(s)?
Please reach out to your Trouw Nutrition contact person and they will make sure your questions are answered.
Manuals
-
pdf (307kB)
-
pdf (485kB)
-
pdf (417kB)
-
How to use video
